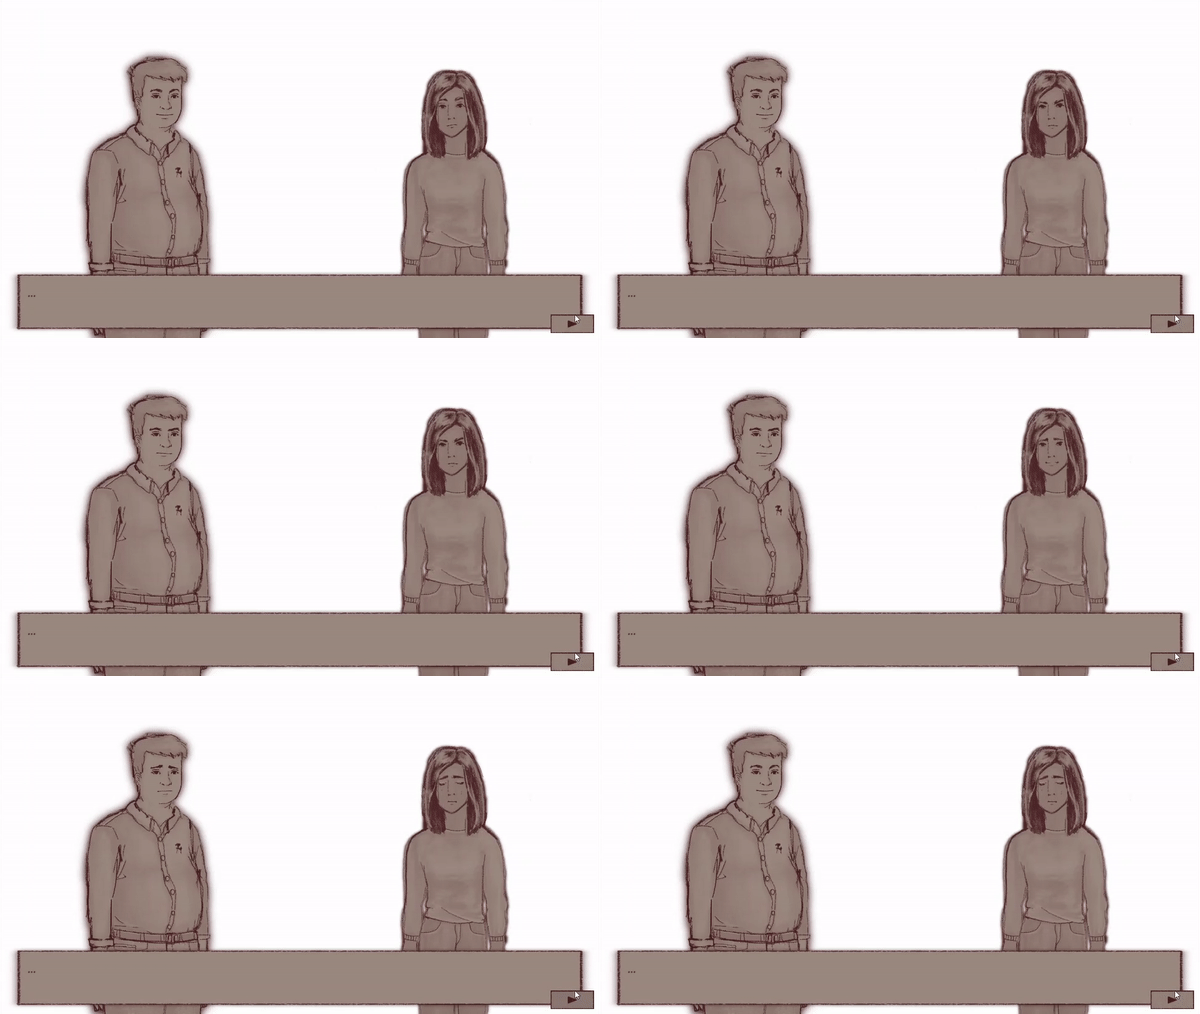
Making a Visual Novel with Unity (3/5) - Characters and emotions
Welcome back to the series on how to make a visual novel with Unity3D and ink. We have already learned the basics of ink and how to use ink API in order to access our story within Unity. We managed to set up a basic structure of our visual novel where we can click through the story and select choices. Today, we’re going to make things more exciting by adding in characters and emotions. If you ever get stuck or just want to see the whole project in action, you can access the files here. Let’s get started!
The example project uses materials from the game Guilt Free, which depicts someone struggling with an eating disorder. If you think this type of story may not be appropriate for you, please use your own files.
External functions
Most of what we’ll be doing today will depend on a very useful functionality of ink - external functions. It’s a way of calling C# code from within ink. Given that, in visual novels, the story is at the core of the gameplay, having the ability to directly call a function at a specified point in our ink file can be extremely useful. An example of this could be showing or hiding characters on the screen. That’s what we’ll focus on today.
Defining functions
In order to call external functions, first, we need to define them at the top of our ink file. We do it by using keyword EXTERNAL like this:
EXTERNAL ShowCharacter(characterName, position, mood)
EXTERNAL HideCharacter(characterName)
As you can see, we can define the function name and any parameters we want to pass into it. For now, we want to define two functions, ShowCharacter will introduce new characters on the screen. We need the name of the character, the position on the screen where we want to display them, and their mood. When removing a character with the HideCharacter() function, we’ll only need the name.
Calling functions
After defining a function, we can call it within our ink file by using curly braces {} like this:
{ShowCharacter("Alice", "Center", “Fine”)}
Similar to ink variables, string parameters need to be wrapped in “”. However, if you were to pass a number, you don’t need to do that.
Go ahead and add the call to show and hide characters anywhere you want in your ink script.
Now, let’s move onto the C# side of things and connect to those functions. In the InkManager class, add the following lines into the StartStory() function. You want to do this after creating a story object and before actually starting the story. Otherwise, ink will throw an error, complaining about missing bindings.
_story.BindExternalFunction("ShowCharacter", (string name, string position, string mood)
    => Debug.Log($"Show character called. {name}, {position}, {mood}"));

_story.BindExternalFunction("HideCharacter", (string name)
    => Debug.Log($"Hide character called. {name}"));
As you can see, we use _story.BindExternalFunction() to create a hook connecting to our predefined functions. It takes function name and function callback as parameters. Bear in mind to use appropriate types for the callback parameters. In our case, we need three strings for the character name, position, and mood. For now, we just want to make sure everything works fine so let’s simply call Debug.Log. We’ll replace it with the actual functionality later on.
Go ahead and press play, your console should be showing some logs:
Character management
Managing characters is actually quite a big piece of functionality, so let’s pause to recap the requirements for it. Our game will have a few characters which we should be able to show and hide from the screen. The characters might need to re-enter the screen, so it would be good to keep references to them instead of destroying objects and recreating them. We should also be able to update their sprites, as they will have a few different emotions which can change as they speak.
We will create a CharacterManager class to handle all of that logic from the top level and to be a bridge between InkManager and individual character objects. It will be responsible for keeping references to characters on the screen, moving and updating them, as well as spawning new ones if needed.
We will also need a Character prefab with an image, and a Character script on it. The script will hold information about the character such as name, mood, etc. It will also provide functionality for showing, hiding, and updating the character it’s attached to.
In order to make mood changes easier, we will create a CharacterMoods script that will be used to store and manage mood sprites for each character within the Unity editor.
Implementation
Let’s start by creating a new game object and calling it Characters. Place it at the top of the Canvas hierarchy as we want characters to display behind the textbox and all the other elements on the screen. Next, create a script called CharacterManager and add it to our new object.
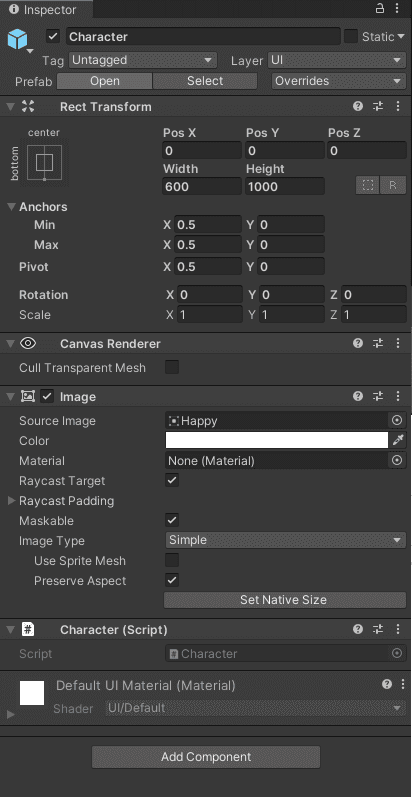
As mentioned before, CharacterManager will be used to spawn new characters using a Character prefab. Let’s go ahead and create it now, a new game object with an image component. Depending on your sprites, the size of your object will most likely be different from mine, but make sure to keep the position, anchors, and pivots the same as in the picture below. It will ensure the animation code works correctly later on.
You will also want to create a new Character script and add it to the prefab. Let’s have a look at it now.
We will use the Character class from the CharacterManager when initializing the character with a correct name, position, and mood. For those values, we could simply use strings, but I like to use enums in these situations to, among other reasons, avoid the potential typos. Place their definitions within a separate CharacterEnums.cs file to keep things clean. In my case they look like this:
public enum CharacterName { Alice, Me };

public enum CharacterPosition { Center, Left, Right };

public enum CharacterMood { Fine, Happy, Sad, SadHappy, Upset, Blush, Crying, Serious, Surprised, Uncomfortable };
Of course, your values here could be very different, depending on the characters within your stories and the moods you need. Now, back in the Character class, let’s define an Init function, which will be used after spawning a new character.
public class Character : MonoBehaviour
{

  public CharacterPosition Position { get; private set; }

  public CharacterName Name { get; private set; }

  public CharacterMood Mood { get; private set; }

  public bool IsShowing { get; private set; }

  private CharacterMoods _moods;

  private float _offScreenX;

  private float _onScreenX;

  private readonly float _animationSpeed = 0.5f;

  public void Init(CharacterName name, CharacterPosition position, CharacterMoods mood, CharacterMoods moods)
  {
    Name = name;
    Position = position;
    Mood = mood;

    _moods = moods;

    Show();
  }
}
You might notice some variables I didn’t mention before. _moods is a container holding all the mood sprites for the character. We will look at it in more detail later on. _offScreenX will be the X value of the position the character will be at when not on the screen. Similarly, _onScreenX will be used to correctly place the character when the Show() function is called. _animationSpeed will define the speed of animation for entering and leaving the screen. Let’s have a look at the Show() function next, but before we do that, make sure to add the LeanTween plugin into your project. We’re going to use it to handle animations.
public void Show()
{

  SetAnimationValues();

  // Position outside of the screen
  transform.position = new Vector3(_offScreenX, transform.position.y, transform.localPosition.z);

  // Set correct mood sprite
  UpdateSprite();

  LeanTween.moveX(gameObject, _onScreenX, _animationSpeed).setEase(LeanTweenType.linear).setOnComplete(() =>
  {
    IsShowing = true;
  });
}
As you can see, first, we’re calling UpdateAnimationValues(). It’s a helper function that will determine the correct values for _offScreenX and _onScreenX based on the desired position of the character (left, right, center). Next, we’re going to place the character at the starting position of our animation, _offScreenX, which will be right outside of the screen. After setting the correct mood sprite in UpdateSprite() function, we’re going to animate the character into the desired position with the use of LeanTween. If you’re not familiar with it, I recommend checking out their documentation. It’s a comprehensive animation engine which is more than enough for what we need here.
You might notice that we’re adding an OnCompletecallback to our animation, which will change the value of IsShowing property within CharacterData. We’ll implement the Hide() function in a similar way.
public void Hide()
{

  LeanTween.moveX(gameObject, _offScreenX, _animationSpeed).setEase(LeanTweenType.linear).setOnComplete(() =>
  {
    IsShowing = false;
  });
}
Now, let’s have a look at the SetAnimationValues() function.
private void SetAnimationValues()
{
  switch (Position)
  {
    case CharacterPosition.Left:
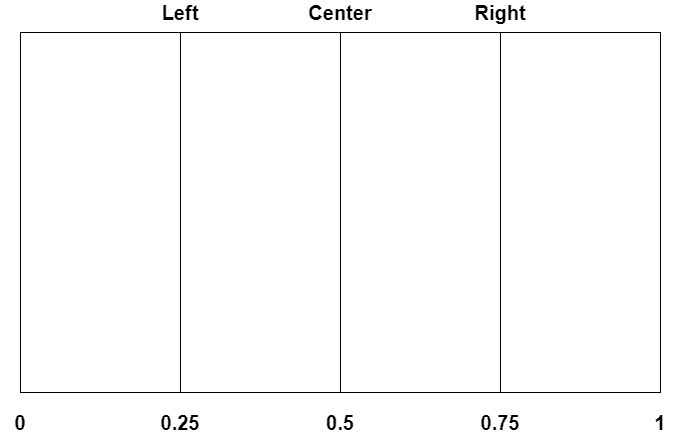
      _onScreenX = Screen.width * 0.25f;
      _offScreenX = -Screen.width * 0.25f;
      break;

    case CharacterPosition.Center:
      _onScreenX = Screen.width * 0.5f;
      _offScreenX = -Screen.width * 0.25f;
      break;

    case CharacterPosition.Right:
      _onScreenX = Screen.width * 0.75f;
      _offScreenX = Screen.width * 1.25f;
      break;
  }
}
In this function, we’re setting different animation values based on the character position. The way I approached it was to mentally slice the screen into 4 even parts and position characters at the edges of those parts:
Let’s have a look at the remaining functions within the Character class next. They’re both used to handle setting the correct character sprite based on the current mood.
public void ChangeMood(Mood mood)
{
  Mood = mood;
  UpdateSprite();
}

private void UpdateSprite()
{
  var sprite = _moods.GetMoodSprite(Mood);
  var image = GetComponent<Image>();

  image.sprite = sprite;
  image.preserveAspect = true;
}
You’ll see that the actual sprite selection happens within the CharacterMoods script, which we haven’t covered yet. Let’s have a look at it now.
public class CharacterMoods
{
  public CharacterName Name;
  public Sprite Fine;
  public Sprite Sad;
  public Sprite SadHappy;
  public Sprite Upset;
  public Sprite Serious;
  public Sprite Surprised;
  public Sprite Crying;
  public Sprite Uncomfortable;

  public Sprite GetMoodSprite(CharacterMood mood)
  {

    switch (mood)
    {
      case CharacterMood.Fine:
        return Fine;
      case CharacterMood.Sad:
        return Sad ?? Fine;
      case CharacterMood.SadHappy:
        return SadHappy ?? Fine;
      case CharacterMood.Upset:
        return Upset ?? Fine;
      case CharacterMood.Serious:
        return Serious ?? Fine;
      case CharacterMood.Surprised:
        return Surprised ?? Fine;
      case CharacterMood.Crying:
        return Crying ?? Fine;
      case CharacterMood.Uncomfortable:
        return Uncomfortable ?? Fine;
      default:
        Debug.Log($"Didn't find Sprite for character: {Name}, mood: {mood}");
        return Fine;
  }
}

}
CharacterMoods is a fairly straightforward script, where we keep all mood sprites for one character and return them based on the enum value passed to the GetMoodSprite() function.
The last thing we need to cover is the CharacterManager script. Go ahead and open it up. First, we’ll need to add the following fields:
private List<Character> _characters;

[SerializeField]
private GameObject _characterPrefab;

[SerializeField]
private CharacterMoods _aliceMoods;

[SerializeField]
private CharacterMoods _playerMoods;

private void Start()
{
  _characters = new List<Character>();
}
_characterPrefab is the prefab we created earlier which we’re going to use to spawn new characters. _charactes, on the other hand, will be a list of characters we have created and displayed on the screen already. You will also notice AliceMoodsand PlayerMoods. These might be different in your project, depending on the characters in your story. Make sure to have one field for each character.
Let’s have a look at the ShowCharacter() function, which will be called from classes like InkManager.
public void ShowCharacter(CharacterName name, CharacterPosition position, CharacterMood mood)
{
  var character = _characters.FirstOrDefault(x => x.Name == name);

  if (character == null)
  {
    var characterObject = Instantiate(_characterPrefab, gameObject.transform, false);

    character = characterObject.GetComponent<Character>();

    _characters.Add(character);
  }
  else if (character.IsShowing)
  {
    Debug.LogWarning($"Failed to show character {name}. Character already showing");
    return;
  }

  character.Init(name, position, mood, GetMoodSetForCharacter(name));
}
First, we’re checking if we’ve not already created this character and if it’s not currently showing. If needed, we’re instantiating a new character using the character prefab and adding its Character script to our _characters list. Then, we’re initializing the character with the received information. You might remember that in ink, we’re using strings to pass character data. That’s why we need to create an overload for the ShowCharacter() function, which will accept strings and convert them to appropriate enums like so:
public void ShowCharacter(string name, string position, string mood)
{
  if (!Enum.TryParse(name, out CharacterName nameEnum))
  {
    Debug.LogWarning($"Failed to parse character name to enum: {name}");
    return;
  }

  if (!Enum.TryParse(position, out CharacterPosition positionEnum))
  {
    Debug.LogWarning($"Failed to parse character position to enum: {position}");
    return;
  }

  if (!Enum.TryParse(mood, out CharacterMood moodEnum))
  {
    Debug.LogWarning($"Failed to parse character mood to enum: {mood}");
    return;
  }

  ShowCharacter(nameEnum, positionEnum, moodEnum);

}
You’ll see that if a conversion didn’t succeed, we’re logging an error and returning. Doing it this way should allow us to detect and fix any potential typos and errors early on. We’ll implement the Hide() function in a similar way, by providing overloads for both an enum and a string argument
public void HideCharacter(string name)
{
  if (!Enum.TryParse(name, out CharacterName nameEnum))
  {
    Debug.LogWarning($"Failed to parse character name to character enum: {name}");
    return;
  }

  HideCharacter(nameEnum);
}

public void HideCharacter(CharacterName name)
{
  var character = _characters.FirstOrDefault(x => x.Name == name);
  if (character?.IsShowing != true)
  {
    Debug.LogWarning($"Character {name} is not currently shown. Can't hide it.");
    return;
  }
  else
  {
    character.Hide();
  }
}
We first check if a character exists in our list and if it is showing. If not, we display a warning and exit the function.
We will need to also be able to handle the change of mood, which will be very similar to how we’ve implemented the Hide() function.
public void ChangeMood(string name, string mood)
{

  if (!Enum.TryParse(name, out CharacterName nameEnum))
  {
    Debug.LogWarning($"Failed to parse character name to character enum: {name}");
    return;
  }

  if (!Enum.TryParse(mood, out CharacterMood moodEnum))
  {
    Debug.LogWarning($"Failed to parse character mood to enum: {mood}");
    return;
  }

  ChangeMood(nameEnum, moodEnum);
}

public void ChangeMood(CharacterName name, CharacterMood mood)
{
  var character = _characters.FirstOrDefault(x => x.Name == name);

  if (character?.IsShowing != true)
  {
    Debug.LogWarning($"Character {name} is not currently shown. Can't change the mood.");
    return;
  }
  else
  {
    character.ChangeMood(mood);
  }
}
We still need to cover one more function in the CharacterManager and that is GetMoodSetForCharacter() which we use when calling Character.Init(). This function consists of a switch statement that returns an appropriate moodset for the requested character.
private CharacterMoods GetMoodSetForCharacter(CharacterName name)
{
  switch (name)
  {
    case CharacterName.Alice:
      return _aliceMoods;
    case CharacterName.Me:
      return _playerMoods;
    default:
      Debug.LogError($"Could not find moodset for {name}");
      return null;
  }
}
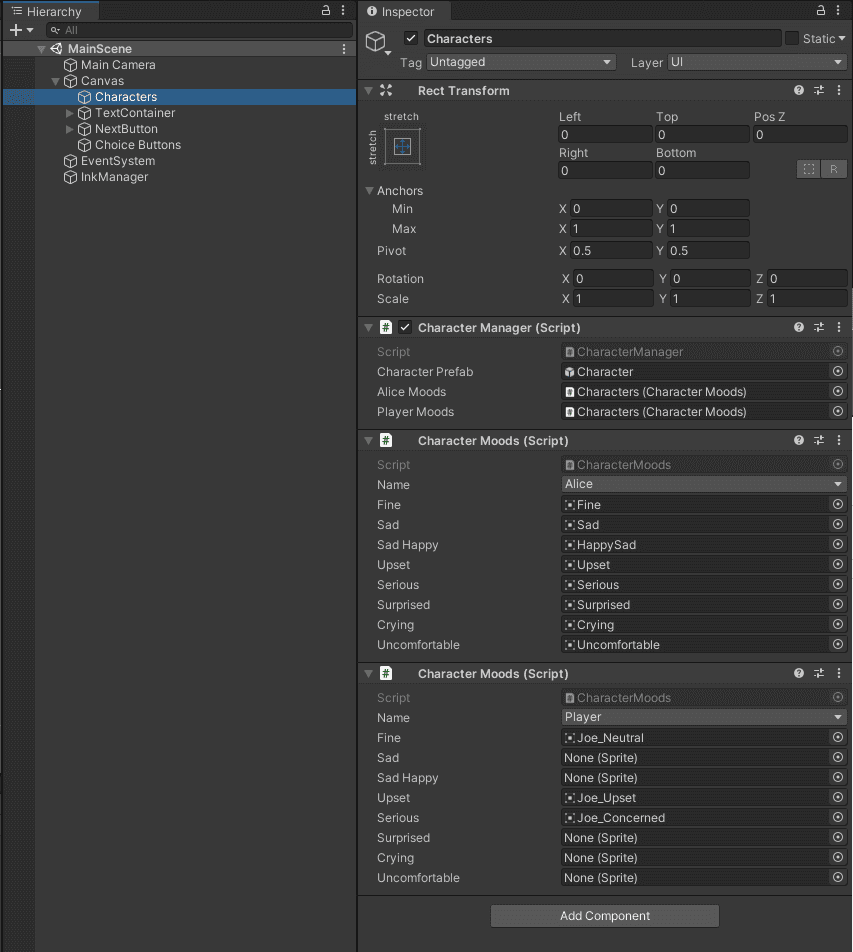
Now that we have all the character handling code in place, let’s go back to the Unity Editor and make sure everything is connected. Your Characters object should look similar to this:
Let’s update our InkManager code now. First of all, we’ll need to create a reference to CharacterManager.
private CharacterManager _characterManager;

void Start()
{
  _characterManager = FindObjectOfType<CharacterManager>();
  StartStory();
}
Then, let's update the external function bindings to use the appropriate methods on the CharacterManager.
_story.BindExternalFunction("ShowCharacter", (string name, string position, string mood)
  => _characterManager.ShowCharacter(name, position, mood));

_story.BindExternalFunction("HideCharacter", (string name)
  => _characterManager.HideCharacter(name));
Running the project at this stage should let you see your characters sliding in and out of the screen. However, we still need to make them change moods. There won’t be anything new to this, just more of what we’ve covered already.

First, define an external function in ink.
EXTERNAL ChangeMood(characterName, mood)
Then, place the ChangeMood calls in appropriate places within your story.
{ChangeMood("Alice", "Sad")}
Next, create a binding in InkManager and have it call the CharacterManager to handle the update.
_story.BindExternalFunction("ChangeMood", (string name, string mood)
  => _characterManager.ChangeMood(name, mood));
If you press play, your characters should be now able to change moods!

Wrapping up
That’s all for today. I hope you enjoyed learning about external functions and that you can see their potential outside of character management. As always, if you want to check my code for this tutorial, you can access it here. And if you need any help, don’t hesitate to get in touch on Twitter.
Happy coding!
All visual assets and sprites used in this tutorial are drawn by Erica Koplitz for the game Guilt Free, created together by me and Erica.
More in this series
- Making a Visual Novel with Unity 1/5 - Introduction to ink
- Making a Visual Novel with Unity 2/5 - Integration with ink
- Making a Visual Novel with Unity 3/5 - Characters and emotions
- Making a Visual Novel with Unity 4/5 - Variables and state handling
- Making a Visual Novel with Unity 5/5 - Localisation


