Making a Visual Novel with Unity (2/5) - Integration with Ink
Now that we know the basics of ink, let’s start to actually work on our game. In this article, I will explain how to integrate ink with our Unity project and how to use the ink API in order to interact with our story.
Before we start, make sure you have an ink file with some dialogues and choices ready. You might want to download and use an example story I prepared. It’s actually a simplified scene from Guilt Free - a game I released earlier this year. By sharing this, I want to show you a real life example of a visual novel and techniques that actually went into production code. I want to note, however, that the game talks about eating disorders, so if you're sensitive to this type of content, please use your own script.
Let’s get started!
Disclaimer: Although this tutorial is aimed at beginners, it does require some basic knowledge of programming and Unity3D. If you’re struggling with something, message me on Twitter, I’ll be happy to help!
Project setup
Go ahead and create a new 2D project in Unity. Then add the ink plugin which you can find here. Whilst you’re downloading the package, feel free to check out the official ink API guide.
In the ink plugin folder (Plugins/Ink) there will be an Example scene, where you can play a very simple novel. The logic for this scene will be written in BasicInkExample script. It handles starting the story, clicking through the dialogues, and selecting choices. Have a look at it, if you like, because we’re going to closely mimic what it does in our own game. We’re not going to work with it though because it's best to learn by doing!
UI Setup
Before we do any UI work, let's just make sure the Canvas is set up correctly. On the Canvas, you should find Canvas Scaler component. Make sure that the UI Scale Mode is set to Scale With Screen Size. This will ensure the elements on the screen look the same on any screen size. I also like to set the Reference Resolution to 1920 x 1080, as this is the resolution I work most often with, but I'll leave that one up to you.

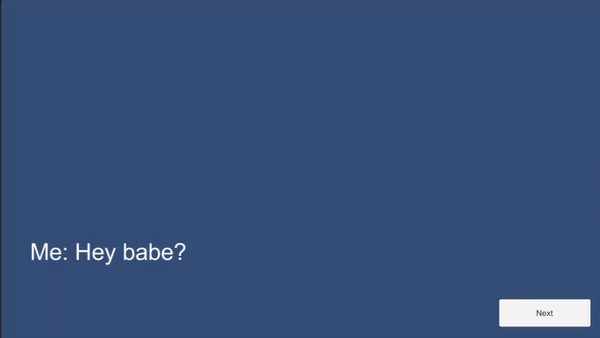
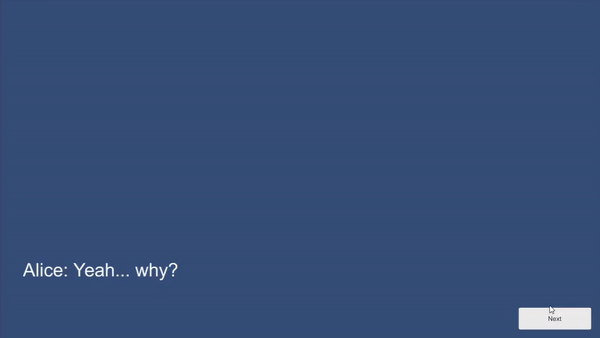
If you’re familiar with visual novels, you’ll know that most of the time they have a big text box at the bottom of the screen. It displays lines of the story which we can click through by pressing a button. That’s pretty much all we need for now. Go ahead, and add those components into your scene. It might look similar to this:

Connecting Ink
Now let’s create an empty object within the hierarchy and call it InkManager. Then add to it a new script with the same name. This will be the core of our game, working as the bridge between the story and the unity project. Write these lines at the top of your InkManager class:
[SerializeField]
private TextAsset _inkJsonAsset;
private Story _story;

[SerializeField]
private Text _textField;
_inkJsonAsset is a reference to the story file which will be used to create an instance of the Story class. This json file is compiled automatically by the ink plugin from the .ink file we wrote in Inky. Let’s go ahead and drop our story file into the Assets folder. You should immediately see two files, like this:

Assign the .json file to the appropriate field on your InkManager script. Don’t forget to assign the text field as well!
At this stage your scene hierarchy and InkManager should look similar to this:

Let’s do some coding now!
We need a way to start our story. First, we have to create an instance of the Story class:
_story = new Story(_inkJsonAsset.text);
This class contains everything you need to interact with ink. We will be using it a lot.
In your InkManager, create a void StartStory() function and add the above line to it. This should be called from your Start() function, as we want to start the story the moment we run the game. We will also need a way to display the lines of our story. Let’s create another function:
public void DisplayNextLine()
{
  if (!_story.canContinue) return;

  string text = _story.Continue(); // gets next line
  text = text?.Trim(); // removes white space from text
  _textField.text = text; // displays new text
}
The first line you see will be very useful in many places. You will often want to check if the story can continue before actually using _story.Continue()to get the next line. Moments, where the story can’t continue are, for example, when we’re awaiting input from the user (choices), when the story has finished, or when something went wrong. We will handle that better later on, but for now, it’s good enough to just exit the function.
Now that we have a way to display our story, let’s call DisplayNextLine() from the StartStory() function. Your script should look like this:
using Ink.Runtime;
using UnityEngine;
using UnityEngine.UI;

public class InkManager : MonoBehaviour
{
  [SerializeField]
  private TextAsset _inkJsonAsset;
  private Story _story;

  [SerializeField]
  private Text _textField;

  void Start()
  {
    StartStory();
  }

  private void StartStory()
  {
    _story = new Story(_inkJsonAsset.text);
    DisplayNextLine();
  }

  public void DisplayNextLine()
  {
    if (!_story.canContinue) return;

    string text = _story.Continue(); // gets next line
    text = text?.Trim(); // removes white space from text
    _textField.text = text; // displays new text
  }
}
Go ahead and hit play. You should see the first line of your story show up on the screen!
Now let’s add some interaction and make sure we can click through the story with the button we added earlier. We'll need to create a script which will call InkManager.DisplayNextLine() function on each click.
using UnityEngine;

public class NextButtonScript : MonoBehaviour
{
  private InkManager _inkManager;

  void Start()
  {
    _inkManager = FindObjectOfType<InkManager>();

    if (_inkManager == null)
    {
      Debug.LogError("Ink Manager was not found!");
    }
  }

  public void OnClick()
  {
    _inkManager?.DisplayNextLine();
  }
}
This also ensures that we’ll get an error whenever InkManager is not in the scene, which can come in handy.
In the editor, create an OnClick event handler and use it to call our new OnClick function. You should now be able to click through the story when you run the game!
Choices
There would be no visual novel without choices and that’s what we’re going to do next. Let’s start by creating an empty game object and calling it ‘Choice Buttons’. This will be a container for our dynamically created choices and we will need to add a Vertical Layout Group to display them correctly. Create a few buttons, add them to your container, and adjust the settings to make sure everything looks good. You’ll want your buttons to be fairly big to make sure they can fit the text. You can also select ‘Best Fit’ property on the Button Text to be on the safe side.

Now save one of the buttons as a ChoiceButton prefab and remove all of them from the button container. We don’t need them now.
Let’s add the following lines into the InkManager script.
[SerializeField]
private VerticalLayoutGroup _choiceButtonContainer;

[SerializeField]
private Button _choiceButtonPrefab;
Now assign the Choice Buttons object we just created and the ChoiceButton prefab to the appropriate fields in the editor.
We need to write some code to create and display the choices now. You will see that we can access the current choices by using _story.currentChoices.
private void DisplayChoices()
{
  // checks if choices are already being displaye
  if (_choiceButtonContainer.GetComponentsInChildren<Button>().Length > 0) return;

  for (int i = 0; i < _story.currentChoices.Count; i++) // iterates through all choices
  {

    var choice = _story.currentChoices[i];
    var button = CreateChoiceButton(choice.text); // creates a choice button

    button.onClick.AddListener(() => OnClickChoiceButton(choice));
  }
}
In our main choice handling function, we first check if we’re not already displaying some choices. Then we iterate through all of the available choices and create a button for each of them. Lastly, we add an OnClick event listener to run when the player presses a choice button. Let’s implement those missing functions now.
Button CreateChoiceButton(string text)
{
  // creates the button from a prefab
  var choiceButton = Instantiate(_choiceButtonPrefab);
  choiceButton.transform.SetParent(_choiceButtonContainer.transform, false);

  // sets text on the button
  var buttonText = choiceButton.GetComponentInChildren<Text>();
  buttonText.text = text;

  return choiceButton;
}
In this function we create a new button from the prefab, insert it into our container, and set the text we passed as a parameter. Then we return the button back to our DisplayChoices() function, where we assign the OnClick event handler:
void OnClickChoiceButton(Choice choice)
{
  _story.ChooseChoiceIndex(choice.index); // tells ink which choice was selected
  RefreshChoiceView(); // removes choices from the screen
  DisplayNextLine();

}
First, we need to tell Ink which choice was clicked by using ChooseChoiceIndex(). Then you’ll see a new function here. After clicking one of the choices, we need to remove all of them from the screen, and that’s what RefreshChoiceView() will do. Afterward, we’ll continue the story with our old DisplayNextLine() function.
void RefreshChoiceView()
{
  if (_choiceButtonContainer != null)
  {
    foreach (var button in _choiceButtonContainer.GetComponentsInChildren<Button>())
    {
      Destroy(button.gameObject);
    }
  }
}
Refreshing choices is pretty straightforward, we just destroy all the objects inside the button container.
Now that we can create and display choices, we need to know when to actually do it. This brings me back to the _story.canContinue property which I mentioned before. If we can’t continue, it might be because we’re facing some choices. A simple way to make sure that’s the case is to simply check the_story.currentChoices property. Let’s update the DisplayNextLine()function now.
public void DisplayNextLine()
{
  if (_story.canContinue)
  {
    string text = _story.Continue(); // gets next line

    text = text?.Trim(); // removes white space from text

    _textField.text = text; // displays new text
  }
  else if (_story.currentChoices.Count > 0)
  {
    DisplayChoices();
  }
}
Go ahead and press play, you should be able to play through the whole story!
You might notice that ink will treat the choice text as part of the story and so we display it in the text view. If you don’t want it to do that, you can, for example, run _story.Continue() within OnClickChoiceButton() to skip that line.
Thoughts
We’re almost done now, but I want to introduce one more small concept before we call it a day. In ink, you can add hashtags to your story to mark lines of text with some additional properties. It works similar to comments in that they won’t be read as part of the story. The difference is, that we can actually access hashtags for each line from the code. They can be used in any way you want. An example I used in my ink file is to differentiate dialogue lines from main character’s thoughts, like so:
Me: Hi!
John: Hey...
Me: He looks upset. I’ll ask him what’s wrong. #thought
Me: What’s wrong? Did something happen?
If you’re using my ink file, you’ll notice some thoughts are already there. If you’re not, go ahead and add a few lines like that into your file and hit play. You shouldn’t see any difference, but they are there.
Now, let’s use a different color and font style for thoughts, to make sure it’s distinct from the normal text. First, we’re going to add new properties to the InkManager class to make it easy to pick text colors within the editor. Don’t forget to actually set those different values to whatever you want!
[SerializeField]
private Color _normalTextColor;

[SerializeField]
private Color _thoughtTextColor;
You can access hashtags by using _story.currentTags. It will return a list of strings, so you can use multiple hashtags per line. Let’s add a new function to style the text based on whether the ‘thought’ tag is there or not.
private void ApplyStyling()
{
  if (_story.currentTags.Contains("thought"))
  {
    _textField.color = _thoughtTextColor;
    _textField.fontStyle = FontStyle.Italic;
  }
  else
  {
    _textField.color = _normalTextColor;
    _textField.fontStyle = FontStyle.Normal;
  }
}
All that’s left is to call our new function before we display each line in DisplayNextLine().
public void DisplayNextLine()
{
  if (_story.canContinue)
  {
    string text = _story.Continue(); // gets next line

    text = text?.Trim(); // removes white space from text

    ApplyStyling();

    _textField.text = text; // displays new text
  }
  else if (_story.currentChoices.Count > 0)
  {
    DisplayChoices();
  }
}
If you press play now, you should see different styling for your thoughts!
Architecture afterthoughts
For the sake of simplicity, I keep most of the tutorial code in one file - InkManager.cs. However, I want to point out that in your game you might want to separate the code into different classes. You could, for example, have one or two classes just to handle displaying text (TextManager) and have InkManager communicate with them through events. Or perhaps you could separate logic code from the UI code by introducing additional classes to handle those things independently. Whatever you do, just make sure you don’t end up with one blown up class with all sorts of responsibilities, it’s never a good idea.
Wrapping up
That’s all for today, I hope you enjoyed it and that you now have a working version of your very own visual novel! If something didn’t work or if you’d just like to see how my project looked at the end of this tutorial, feel free to download it here. I also added some visuals and fonts in there to give you an idea of what you could change in your game. Next time we’re going to focus on the characters and their emotions, which should make our game much more interesting and engaging!
Happy Coding!
More in this series
- Making a Visual Novel with Unity 1/5 - Introduction to ink
- Making a Visual Novel with Unity 2/5 - Integration with ink
- Making a Visual Novel with Unity 3/5 - Characters and emotions
- Making a Visual Novel with Unity 4/5 - State handling
- Making a Visual Novel with Unity 5/5 - Localisation